With lockdown and the pandemic not ending any time soon, I decided I needed a new hobby. I'd always wanted to get into painting, but wasn't quite sure how I wanted to do it. I knew it would be abstract, realism wasn't something I was going to be able to do, so I started exploring online and discovered paint pouring.
First thing I needed was some paint. My bestie Fal is an artist and she recommend The Works for cheap but decent acrylic paint. I ordered myself some of these Crawford & Black tubes, £2 for 200ml, in a variety of basic colours.
Next up is the prep. You need something to paint on. Most people paint on canvas, but I've been using wood. My husband has gotten into wood work so I've been pinching his offcuts to recycle for my art projects. I make sure the wood is smooth, give it a wipe with a damp cloth to make sure it isn't dusty, and then paint a base layer onto the wood. I'd recommend painting a base layer on any canvas if you are using that too. I let this dry for a day before I then began the pour itself.

The most important part of paint pouring is your mix. For acrylic paint you can get proper liquid for pouring, but for a budget option you can also use water, which is what I used. It needs to be a 50/50 mix of paint and water that flows nicely, but isn't watery. It's easiest to use clear plastic cups for this so you can see the mixture, and something like a lolipop stick to mix it. I used wooden BBQ kebab sticks to mix as this was what I happened to find in my kitchen drawer that I could use without buying anything else. You want it to be able to drip off the stick, but not run. You can also add a couple of drops of silicone oil which when combined with heat creates 'cells' in paint, but again, I haven't purchased any yet to try that out.
I laid out a plastic sheet on my kitchen table, and had three pieces of wood prepped to use. On YouTube a lot of the people who do paint pour videos have a lot of waste that drips off their canvas onto their work area, and I wasn't keen on that, so I decided I would put a smaller piece of wood in front of me to let the excess paint drip off onto, rather than waste it.
For my first attempt, I didn't want to use too many colours in case it went wrong. I picked out white, blue and green, atlas sort of colours, and figured I'd create some sort of surreal earth looking painting.
I started out pouring white paint onto the centre of the wood, creating a sort of pool. Then I poured blue directly onto the white, and then green directly on top of that too. Then it's time to pick up the wood and start tilting it to get the paint moving. I realised quite quickly that you need a lot more paint that you first anticipate in order for it to cover your base, so I added smaller pools of the three colours further towards the edges of the wood to make sure it would totally cover. As the paint ran off this wood I made sure to drip it onto the smaller piece of wood so I didn't waste the excess.
I also had a second piece of wood prepped as I thought I might have enough paint mixed to do that one too and I was right, and some! For these three I mixed approximately 50ml of paint with 50ml of water, and had some leftover of all three paints.
Once I was happy with how the painted had tilted and spread out across my first piece, I had a small bit of wood ready to pop it into so that it stayed raised off the plastic sheeting and didn't stick to it.
This is piece number one! I was so thrilled with how it came out. The wood I used wasn't totally flat and had some holes and marks in it, but this was just my first attempt so I don't mind.
This is the smaller piece of wood that I dripped the excess onto so I didn't waste it.
This is the other larger piece I did at the same time. If you find there are gaps that won't fill it's very easy to just pour a tiny amount more paint onto the base that you think will work. I usually try to add a couple of drops of more than one colour so it mixes in better rather than being an obvious blob of paint.
These don't have any sealant on them, so they will need varnishing or covering to protect the acrylic. Because of the thickness of the paint, these do take a lot of time to dry, it was a good three days before I could move these and then use my workspace again, so be sure you aren't occupying a space you need to use anytime soon.
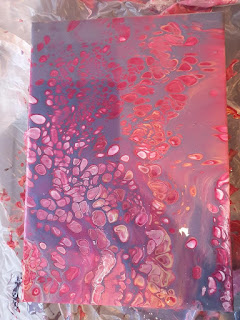
On the third day I decided to prep another 2 pieces of wood for another attempt. This time I utilised part of an old bit of wooden furniture. As all the edges were solid, I made sure to paint all four edges of the wood as then if I wanted to put it up on a wall without a frame I could. As the paint drips off the edges, they can easily become part of the art itself.
This time I wanted to go for some really contrasting colours. I had plenty of white mixed up from my first attempt that was still fine for me to use, the blue and green were also fine to use but I wanted to use different colours. Inspired by an old favourite pair of Converses with flames on, I mixed up some black, red and yellow to go with the white.
This time I made a lot of different smaller pools of paint in random mixtures across the whole piece of wood to get more movement. This was a much bigger piece of wood so I wanted to make sure I had plenty of paint ready.
I also had the piece of wood ready to catch the drips so as not to waste them, which is the piece below. The many small drips mean a lot more detail and smaller mixes of paint, so you can decide which look you prefer.
The other thing I will mention is that your hands will get covered in paint as you pour, so make sure you aren't wearing anything you don't want to get paint on, and that you have decent soap and an open door to where your sink is so you don't risk transferring paint onto doors when you are ready to wash up! I've not worn gloves to pour as acrylic paint is very easy to wash off, and disposable plastic gloves every time is just creating more plastic waste.
There are a lot of other ways to do paint pouring, including pouring all your different paints in one cup and pouring directly from that, using a hairdryer, and all sorts! I can't wait to experiment with more, and will probably invest in some canvasses in the new year to try out some larger scale pours.
Have you taken up a new hobby, or rediscovered an old one in 2020?
Much love,
Kitty xxxx