One of things I was most worried about when I initially got engaged was my health. At the time I got engaged my chronic headaches and migraines were a real problem for me. I've talked about my life with chronic pain a few times, and for more specific details on it you can read about it here and here, learn about my treatment here, and watch my vlog about it here! I'm not going to go into specifics about it today, but instead talk about how my health has affected my wedding.
When you have a chronic illness, you tend to know there are certain things you can and can't do. I've been incredibly lucky to begin having Botox for my chronic head pain which means I can now do things I couldn't do before. When we got engaged I didn't expect to be able to wear a veil, flower crown, tiara, anything that would sit on my head basically! It would mean more pain than usual, and really paying for it the next day. It's just not worth the risk to potentially end up misterable on your wedding day.
For me, it was about compromise. Looking the way I want to on my wedding day vs the repercussions of essentially knowingly exacerbating my pain. A headband was an absolute no, but could light weight cute clips work? I could probably abide those for a few hours for the reception and photos, and then ditch the for the evening do. Could I plait ribbons into my hair? Or wear a veil that draped over my whole head front and back without being attached?
Being 'you' on your wedding day is so important, but not at the risk of damaging your health further. More recently I have been diagnosed with carpal tunnel in both of my wrists. I struggle to hold weight in my hands, grip properly, and they ache or hurt almost all of the time. One of the things I've dreamed about is my bouquet. A giant thing, full of my favourite plants and nature, my 5ft 11 frame meant I felt I could carry off a larger bouquet than most. And now I can't open a bottle of Pepsi Max, or have to get Stu to help me cut up my food. So reality hits. I can't carry that dream bouquet.
And now I have to reconsider my options. My florist is coming up with ideas for me, but it looks like I'll have to opt for a different design, with a wrist strap of some kind, or risk being unable to use my hands properly the next day. Or, I can wear wrist splints on both of my wrists and aim to get help carrying my bouquet during the day. I must admit, this is the option I like the least. My splints give away my pain, and don't match my outfit! If I do have to wear them, I could glam them up, wrap them in ribbon, or glitter them up. There is no avoiding seeing them, so if I do wear them, they'll have to be made to look like they belong. I will admit I cried when I realised that I might not be able to have the one part of my wedding I was so set on, I cried a lot. My health has impacted upon my life so much, but my wedding day.... I had been desperate to avoid that.
Spot the wrist splint!
You should feel amazing on your wedding day. Try to get a good nights sleep the night before (which I know is going to be so hard with how excited I'll be!). So when I wake up I will ensure I take all my usual medication, drink plenty of water, take some painkillers, and make sure I have more in my wedding bag. I will eat an appropriate breakfast. Self care is hugely important, and a good start to the day can really help. I plan to rest if I need to, the bridal suite is there to sneak off to if I need some down time.
2 of my 4 bridesmaids!
The key thing is asking for help. I plan on roping my bridesmaids in to help carry my bouquet so I can rest between photos. They'll be commissioned to keep me hydrated properly too. My wonderful and enthusiastic florist at Fleurtations is determined to find me a way to carry my dream bouquet. You never know what suggestions people might have, so ask for help! It's OK to acknowledge that there are things you can and can't do, but it's also more than OK to ask people to help you with your health on the day. Your bridal party love you, so explain the situation and I am sure they will help look after you.
One of things I was most worried about when I initially got engaged was my health. At the time I got engaged my chronic headaches and migraines were a real problem for me. I've talked about my life with chronic pain a few times, and for more specific details on it you can read about it here and here, learn about my treatment here, and watch my vlog about it here! I'm not going to go into specifics about it today, but instead talk about how my health has affected my wedding.
When you have a chronic illness, you tend to know there are certain things you can and can't do. I've been incredibly lucky to begin having Botox for my chronic head pain which means I can now do things I couldn't do before. When we got engaged I didn't expect to be able to wear a veil, flower crown, tiara, anything that would sit on my head basically! It would mean more pain than usual, and really paying for it the next day. It's just not worth the risk to potentially end up misterable on your wedding day.
For me, it was about compromise. Looking the way I want to on my wedding day vs the repercussions of essentially knowingly exacerbating my pain. A headband was an absolute no, but could light weight cute clips work? I could probably abide those for a few hours for the reception and photos, and then ditch the for the evening do. Could I plait ribbons into my hair? Or wear a veil that draped over my whole head front and back without being attached?
Being 'you' on your wedding day is so important, but not at the risk of damaging your health further. More recently I have been diagnosed with carpal tunnel in both of my wrists. I struggle to hold weight in my hands, grip properly, and they ache or hurt almost all of the time. One of the things I've dreamed about is my bouquet. A giant thing, full of my favourite plants and nature, my 5ft 11 frame meant I felt I could carry off a larger bouquet than most. And now I can't open a bottle of Pepsi Max, or have to get Stu to help me cut up my food. So reality hits. I can't carry that dream bouquet.
And now I have to reconsider my options. My florist is coming up with ideas for me, but it looks like I'll have to opt for a different design, with a wrist strap of some kind, or risk being unable to use my hands properly the next day. Or, I can wear wrist splints on both of my wrists and aim to get help carrying my bouquet during the day. I must admit, this is the option I like the least. My splints give away my pain, and don't match my outfit! If I do have to wear them, I could glam them up, wrap them in ribbon, or glitter them up. There is no avoiding seeing them, so if I do wear them, they'll have to be made to look like they belong. I will admit I cried when I realised that I might not be able to have the one part of my wedding I was so set on, I cried a lot. My health has impacted upon my life so much, but my wedding day.... I had been desperate to avoid that.
Spot the wrist splint!
You should feel amazing on your wedding day. Try to get a good nights sleep the night before (which I know is going to be so hard with how excited I'll be!). So when I wake up I will ensure I take all my usual medication, drink plenty of water, take some painkillers, and make sure I have more in my wedding bag. I will eat an appropriate breakfast. Self care is hugely important, and a good start to the day can really help. I plan to rest if I need to, the bridal suite is there to sneak off to if I need some down time.
2 of my 4 bridesmaids!
The key thing is asking for help. I plan on roping my bridesmaids in to help carry my bouquet so I can rest between photos. They'll be commissioned to keep me hydrated properly too. My wonderful and enthusiastic florist at Fleurtations is determined to find me a way to carry my dream bouquet. You never know what suggestions people might have, so ask for help! It's OK to acknowledge that there are things you can and can't do, but it's also more than OK to ask people to help you with your health on the day. Your bridal party love you, so explain the situation and I am sure they will help look after you.
This week's topic is one I have personal experience of, so it's a tough one. Something I see asked a lot in bridal groups on facebook is 'How can I demote my bridesmaid?'. Often the people asking want to know if people have done it and remained friends, how they did it, and if it was worth it. I'm a little unusual, because I've been on the other end of things. I was the bridesmaid who was demoted. I've written a little about it before here, but that was mostly about how you should treat your bridal party, than my demotion story. So... here goes!
So first off, you've probably excitedly asked your nearest and dearest to be your bridesmaid, having thought about your friends being a part of your day with your partner. I'm going to talk about my experience as a bridesmaid being demoted, but of course your bridal party does not have to contain only women! Gender is irrelevant when it comes to who your best friends are. People tend to come up with their own terms for men in the bridal party, or women who are part of the groom's party, so I'm going to stick to the term bridesmaid for my own ease.
Your wedding is more than likely at the fore front of your mind most of the time. There is a lot of planning to do, and a lot of expenses to keep in check, and hopefully, just hopefully, bridesmaids who will help you with some of that.
I was due to be a bridesmaid for my best friend from university. We lived across the country from each other, her in London, me in Grimsby, so distance was hard, but we chatted online a lot. When she got engaged I was thrilled, and I was so excited when she sent me a card in the post to ask me to be her bridesmaid. What an honour! I said yes right away. For a little while, I didn't have any responsibilities. I lived so far away I couldn't go venue hunting, or dress shopping, but I kept up to date with everything that was going on.
Then we booked a date for bridesmaid dress shopping, awesome! Off I went to London on the train, which isn't cheap. But worth it, I'm a bridesmaid! She was very specific and wanted a certain brand, who don't make plus sizes. Problem number one. I mentioned this to her right away, and said I could get someone to make the exact same thing, but to my sizes, as I know an amazing dress maker. Not good enough, she wanted us to wear that specific brand. So off we went. She picked the dresses, and very kindly bought them for us. It was 3 sizes too small for me easily, but the biggest they did. I bought some fabric from the store to get it made bigger. I thought problem solved. She did not. She wanted me to wear the dress as it, and fit into it.... so she expected me to lose weight. Not her body, not her choice, not cool.
And then the real problems started. I experienced what was initially thought to be a stroke. I was rushed to hospital and spent time on the stroke ward till it was confirmed I hadn't had a stroke, but instead all the symptoms of it. 3 days later it happened again. Another ambulance. Another stroke ward. In the first 2 weeks that this started happening, it happened 20 or more times. In the first month, I couldn't even begin to tell you how many. I was so ill. It was exhausting, I threw up and couldn't eat or stay hydrated, and the pain. The pain was excruciating. I already had a chronic pain condition, but this was something else. I was essentially housebound and needed supervision due to how confused I got during one of my 'episodes'. I'd later found out they were severe hemiplegic migraines that were exacerbated by medication I was taking.
Then the hen do announcement came. Disneyland Paris. There was no way I could go. I hadn't worked in a month, so I hadn't been getting paid. I was completely broke. I needed someone to keep an eye on me at all times, I couldn't drive, I was in constant pain and exhausted all the time. I would have been a liability travelling, and I would have been a burden on those who could go.
She wasn't impressed. One of the other bridesmaids couldn't go either. So she had another hen party, this time at her Mum's house which was around 2 hours from me by car. I got permission for my Mum to come so she could drive me as I wasn't allowed to drive at that point. The sudden numbness and violent stabbing pains made it unsafe for me to do so. So my Mum took me, and I had a lovely time. My illness wasn't really mentioned till the very end, when her Mum commented that she heard I'd been ill. My Mum explained the situation and she was shocked. How could someone so young be so ill suddenly? I got the feeling they didn't really believe us.
Over the next few weeks, things hotted up. I went back to work part time. And every day, the messages began. I had to find shoes, a bag, and a cover up. I have size 10 feet, so the shoes were an issue. I found some she liked and approved and ordered them. She didn't want me to have a bag, even if Stu looked after it for me all day. I needed a bag, because I was taking approximately 70 pills a day and had emergency medication I may have to take to prevent an episode at very short notice. She didn't agree that I needed a bag. I never found a cover up she felt was OK. I have no idea if anyone did. I got my earrings approved because I have stretched ears. Then she changed her mind and said they weren't OK after I'd ordered them. I was then told I was to wear no jewellery, save for one single ring. I thought that was pretty intense, and aimed at me, because my 'thing' is my rings. Whatever, I can do that. It's not my day.
And the final issue she had. My hair. I had pink hair. I had pink hair when she asked me to be bridesmaid, and had had pink hair for years, since she met me essentially. She wanted me to have my hair returned to a normal colour, so she could dye her previously blonde hair pink and not have me 'steal' her pink hair thunder. I was over it. It might have been her day, but it was my hair! I ignored those requests.
Then her Mum began emailing me. She'd ask me a question, then half an hour later when I hadn't replied email me again. And again. And facebook message me. I was still struggling with my health massively, and I was usually getting these messages during the few hours I tried to get back to my job, so couldn't respond. You can't expect people to be available 24/7 for your questions.
And then, the final messages. I got an email telling me that we needed to talk. That I needed to seriously think about my ability to dedicate myself 100% to her wedding, and being bridesmaid, and to stop using my health as an excuse. I was no longer to be her bridesmaid, but I was more than welcome to attend as a guest if I wanted to. I was to return the dress I had paid to be altered to her immediately so she could sell it to recover the money she had wasted on me being bridesmaid.
I, very politely, wrote a reply that in essence, told her to ram it. I wouldn't be returning the dress, and I wouldn't be attending her wedding. My health was my priority. At that point hospital trips were a regular thing for me, and I couldn't sleep through the night even because of the agony. Some awful things were ultimately said on both sides, and we've never spoken again.
The only time I think of her now is when people discuss demoting a bridesmaid for not being dedicated enough. Because it's not just a case of demoting a bridesmaid, but of potentially losing someone you love, forever, irreparably. Please think really long, and hard, before you demote a bridesmaid. Because you are taking the risk that you will never be able to speak to that person again. I don't know if that is what my former friend expected, but for me there was no going back because of the circumstances. She felt her wedding should have been more important to me than my own health. And it couldn't be.
You don't always know what is going on in your bridesmaid's lives. They could be going through any kind of trauma that is distracting them, so please try to be understanding. Your day might be the most important thing in your world, but it isn't in theirs. I totally get that every circumstance is different, who knows what awful thing your bridesmaid may have done, but I wanted to share my own experience of being demoted, to try to help show you the other side, and to show you what the outcome ultimately was.
A friendship over, because I couldn't dedicate myself due to circumstances beyond my control.
Do you have your own bridal demotion story? I'd be so interested to hear more from both sides.
This week's topic is one I have personal experience of, so it's a tough one. Something I see asked a lot in bridal groups on facebook is 'How can I demote my bridesmaid?'. Often the people asking want to know if people have done it and remained friends, how they did it, and if it was worth it. I'm a little unusual, because I've been on the other end of things. I was the bridesmaid who was demoted. I've written a little about it before here, but that was mostly about how you should treat your bridal party, than my demotion story. So... here goes!
So first off, you've probably excitedly asked your nearest and dearest to be your bridesmaid, having thought about your friends being a part of your day with your partner. I'm going to talk about my experience as a bridesmaid being demoted, but of course your bridal party does not have to contain only women! Gender is irrelevant when it comes to who your best friends are. People tend to come up with their own terms for men in the bridal party, or women who are part of the groom's party, so I'm going to stick to the term bridesmaid for my own ease.
Your wedding is more than likely at the fore front of your mind most of the time. There is a lot of planning to do, and a lot of expenses to keep in check, and hopefully, just hopefully, bridesmaids who will help you with some of that.
I was due to be a bridesmaid for my best friend from university. We lived across the country from each other, her in London, me in Grimsby, so distance was hard, but we chatted online a lot. When she got engaged I was thrilled, and I was so excited when she sent me a card in the post to ask me to be her bridesmaid. What an honour! I said yes right away. For a little while, I didn't have any responsibilities. I lived so far away I couldn't go venue hunting, or dress shopping, but I kept up to date with everything that was going on.
Then we booked a date for bridesmaid dress shopping, awesome! Off I went to London on the train, which isn't cheap. But worth it, I'm a bridesmaid! She was very specific and wanted a certain brand, who don't make plus sizes. Problem number one. I mentioned this to her right away, and said I could get someone to make the exact same thing, but to my sizes, as I know an amazing dress maker. Not good enough, she wanted us to wear that specific brand. So off we went. She picked the dresses, and very kindly bought them for us. It was 3 sizes too small for me easily, but the biggest they did. I bought some fabric from the store to get it made bigger. I thought problem solved. She did not. She wanted me to wear the dress as it, and fit into it.... so she expected me to lose weight. Not her body, not her choice, not cool.
And then the real problems started. I experienced what was initially thought to be a stroke. I was rushed to hospital and spent time on the stroke ward till it was confirmed I hadn't had a stroke, but instead all the symptoms of it. 3 days later it happened again. Another ambulance. Another stroke ward. In the first 2 weeks that this started happening, it happened 20 or more times. In the first month, I couldn't even begin to tell you how many. I was so ill. It was exhausting, I threw up and couldn't eat or stay hydrated, and the pain. The pain was excruciating. I already had a chronic pain condition, but this was something else. I was essentially housebound and needed supervision due to how confused I got during one of my 'episodes'. I'd later found out they were severe hemiplegic migraines that were exacerbated by medication I was taking.
Then the hen do announcement came. Disneyland Paris. There was no way I could go. I hadn't worked in a month, so I hadn't been getting paid. I was completely broke. I needed someone to keep an eye on me at all times, I couldn't drive, I was in constant pain and exhausted all the time. I would have been a liability travelling, and I would have been a burden on those who could go.
She wasn't impressed. One of the other bridesmaids couldn't go either. So she had another hen party, this time at her Mum's house which was around 2 hours from me by car. I got permission for my Mum to come so she could drive me as I wasn't allowed to drive at that point. The sudden numbness and violent stabbing pains made it unsafe for me to do so. So my Mum took me, and I had a lovely time. My illness wasn't really mentioned till the very end, when her Mum commented that she heard I'd been ill. My Mum explained the situation and she was shocked. How could someone so young be so ill suddenly? I got the feeling they didn't really believe us.
Over the next few weeks, things hotted up. I went back to work part time. And every day, the messages began. I had to find shoes, a bag, and a cover up. I have size 10 feet, so the shoes were an issue. I found some she liked and approved and ordered them. She didn't want me to have a bag, even if Stu looked after it for me all day. I needed a bag, because I was taking approximately 70 pills a day and had emergency medication I may have to take to prevent an episode at very short notice. She didn't agree that I needed a bag. I never found a cover up she felt was OK. I have no idea if anyone did. I got my earrings approved because I have stretched ears. Then she changed her mind and said they weren't OK after I'd ordered them. I was then told I was to wear no jewellery, save for one single ring. I thought that was pretty intense, and aimed at me, because my 'thing' is my rings. Whatever, I can do that. It's not my day.
And the final issue she had. My hair. I had pink hair. I had pink hair when she asked me to be bridesmaid, and had had pink hair for years, since she met me essentially. She wanted me to have my hair returned to a normal colour, so she could dye her previously blonde hair pink and not have me 'steal' her pink hair thunder. I was over it. It might have been her day, but it was my hair! I ignored those requests.
Then her Mum began emailing me. She'd ask me a question, then half an hour later when I hadn't replied email me again. And again. And facebook message me. I was still struggling with my health massively, and I was usually getting these messages during the few hours I tried to get back to my job, so couldn't respond. You can't expect people to be available 24/7 for your questions.
And then, the final messages. I got an email telling me that we needed to talk. That I needed to seriously think about my ability to dedicate myself 100% to her wedding, and being bridesmaid, and to stop using my health as an excuse. I was no longer to be her bridesmaid, but I was more than welcome to attend as a guest if I wanted to. I was to return the dress I had paid to be altered to her immediately so she could sell it to recover the money she had wasted on me being bridesmaid.
I, very politely, wrote a reply that in essence, told her to ram it. I wouldn't be returning the dress, and I wouldn't be attending her wedding. My health was my priority. At that point hospital trips were a regular thing for me, and I couldn't sleep through the night even because of the agony. Some awful things were ultimately said on both sides, and we've never spoken again.
The only time I think of her now is when people discuss demoting a bridesmaid for not being dedicated enough. Because it's not just a case of demoting a bridesmaid, but of potentially losing someone you love, forever, irreparably. Please think really long, and hard, before you demote a bridesmaid. Because you are taking the risk that you will never be able to speak to that person again. I don't know if that is what my former friend expected, but for me there was no going back because of the circumstances. She felt her wedding should have been more important to me than my own health. And it couldn't be.
You don't always know what is going on in your bridesmaid's lives. They could be going through any kind of trauma that is distracting them, so please try to be understanding. Your day might be the most important thing in your world, but it isn't in theirs. I totally get that every circumstance is different, who knows what awful thing your bridesmaid may have done, but I wanted to share my own experience of being demoted, to try to help show you the other side, and to show you what the outcome ultimately was.
A friendship over, because I couldn't dedicate myself due to circumstances beyond my control.
Do you have your own bridal demotion story? I'd be so interested to hear more from both sides.
Like a lot of people, I only plan to get married the once. It's going to be one of, if not the biggest day of my life, and I want it preserved perfectly in photos to keep forever. Your photos are such a big part of the day, and picking the right photographer is so so important. I've seen a trend recently in magazines and various media outlets suggesting that actually, rather than spend money on an incredible professional photographer, you should just get a mate to do it!
There are a whole bunch of things wrong with that suggestion, and I'm going to talk about why you should book a real, actual, wedding photographer, and the reasons people usually give for not doing it.
There was an ugly sign on the lawns in this photo, not anymore with a pro!
1. Wedding photography is expensive.
Damn right it is! So first off, when you book a wedding photographer, you aren't just paying for that one day. You are paying for years of skill, training, practice, editing and love for their job. Photographing a wedding is bloody terrifying. And I know that, because I've done it! It is the most important day of most people's lives, and they are trusting you to give them because photos back, so wouldn't you want to give that job to an experience professional? Editing your wedding photos takes hours and hours. Every single photo needs assessing and checking, and processing and perfecting. A raw iPhone or camera photo is not the same thing a wedding photographer gives you. Do you have any idea how long it takes to put together an album? To make sure it flows perfectly and tells a story?You are paying for skills, time, experience and love. Your wedding photos are forever. Saving a couple of quid in the long run isn't worth it.
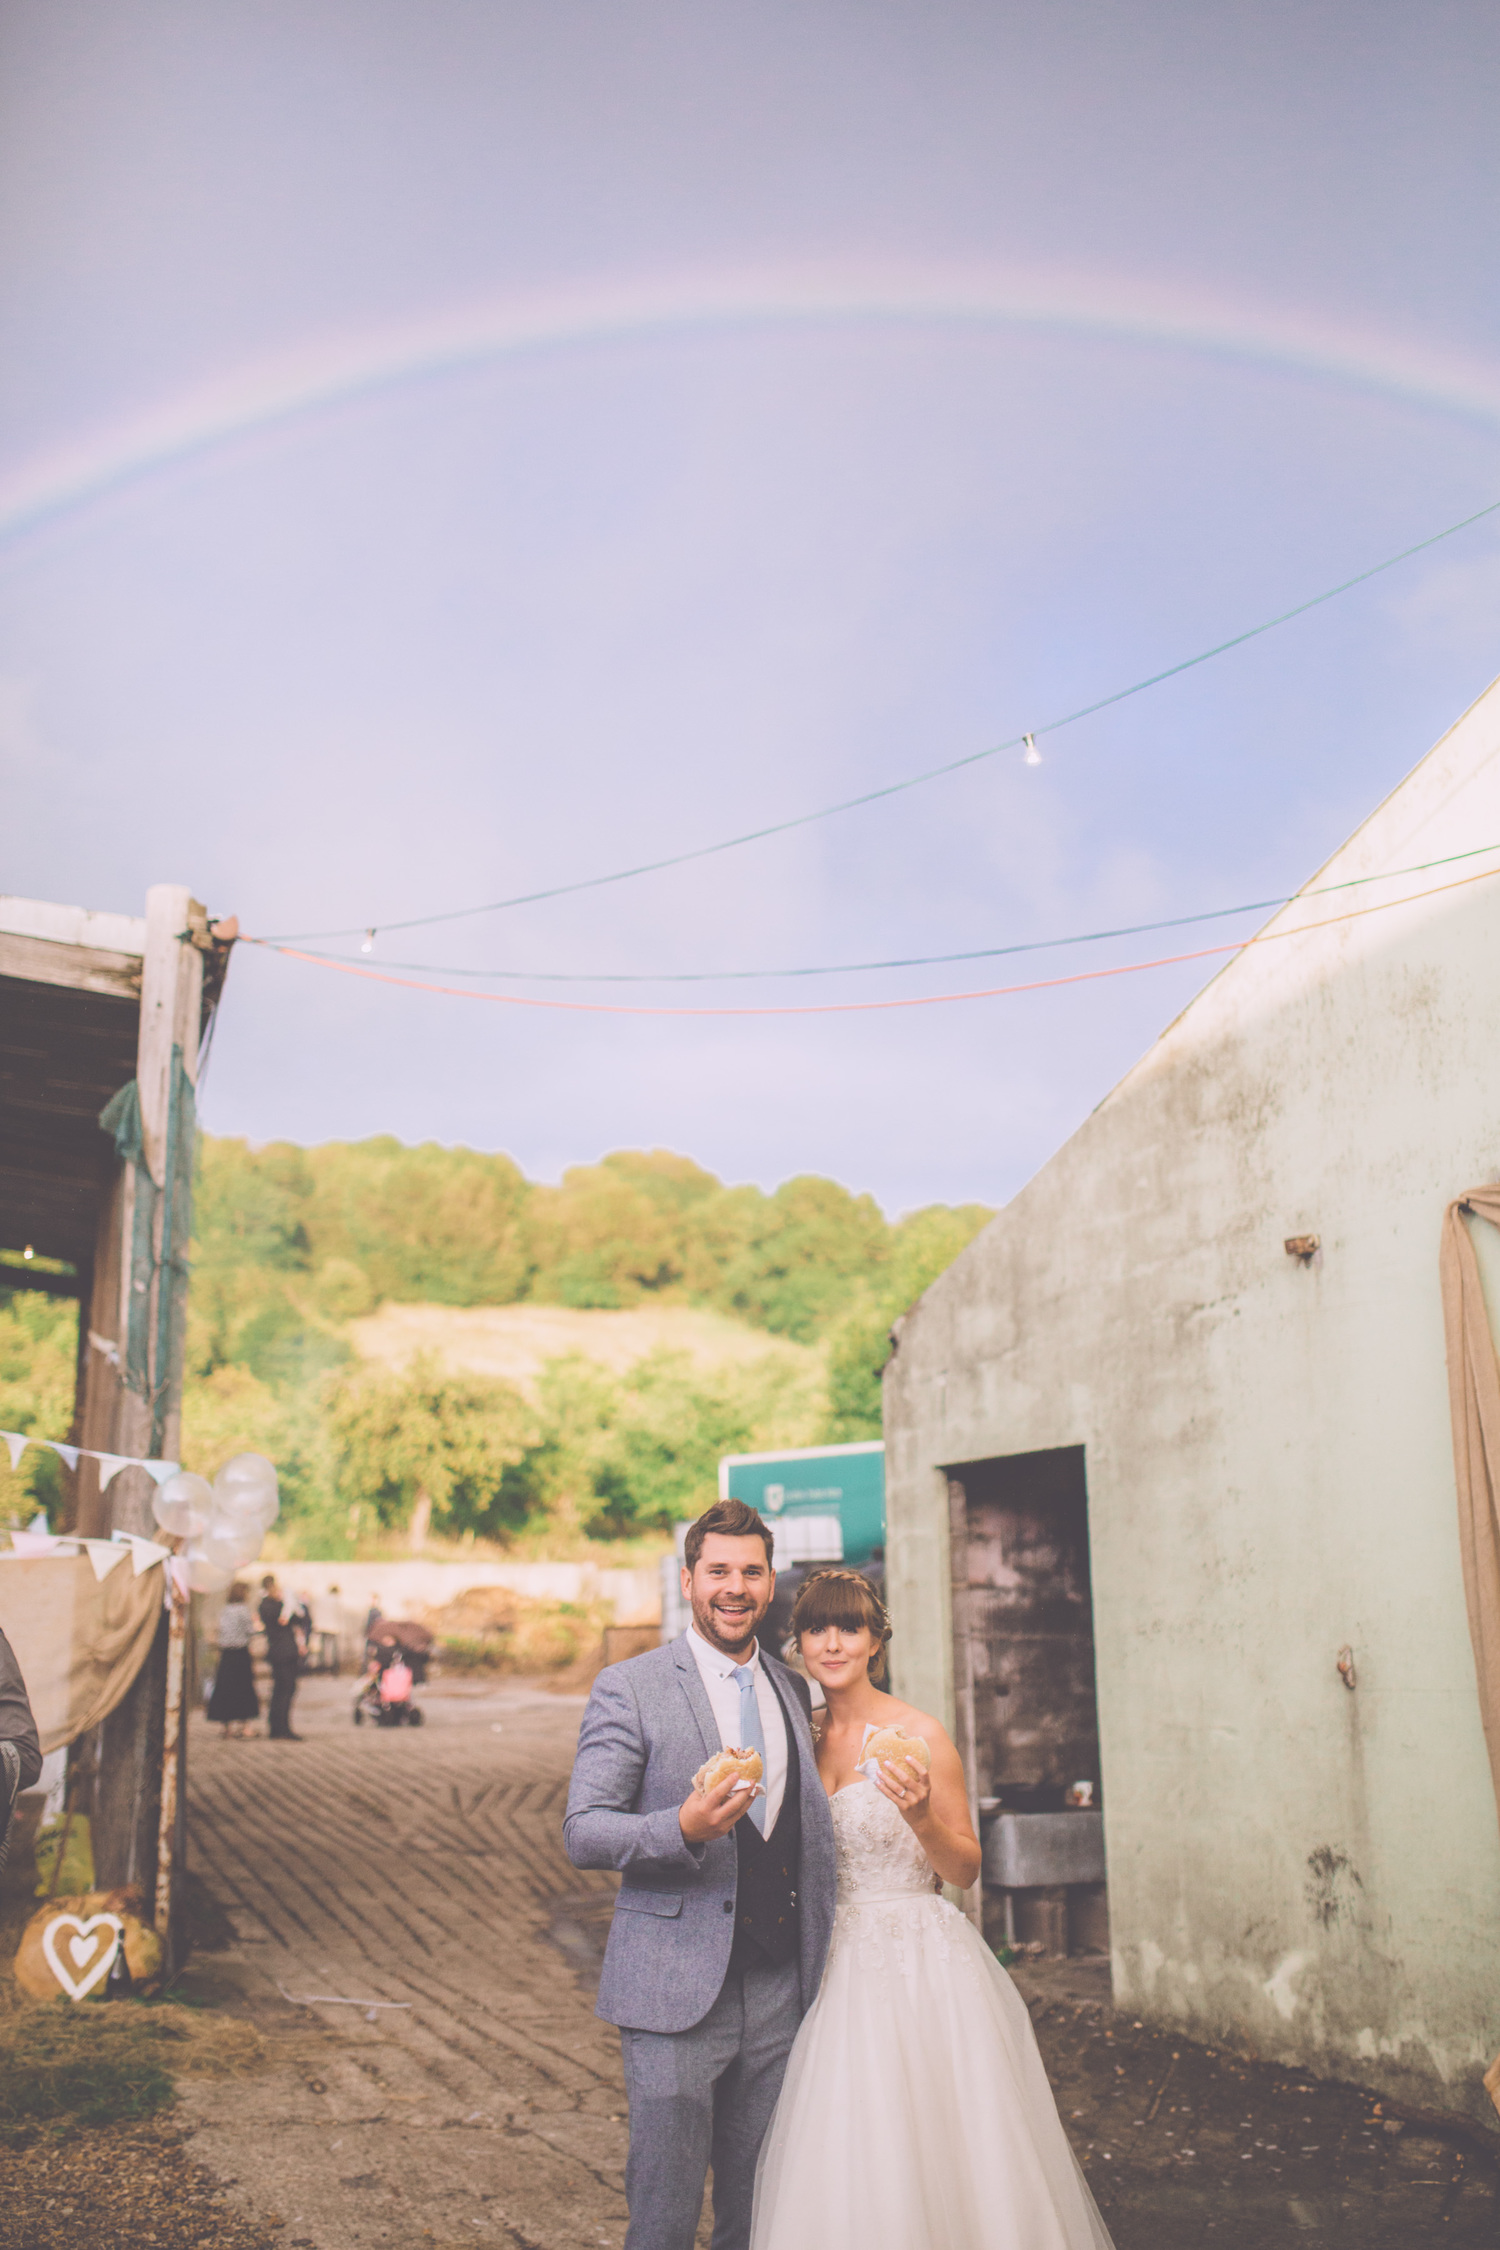
Photography by Naomi Jane Photography
That rainbow! It takes serious skill to capture that and the rest of the scene so well.
2. Having a friend do it means a better rapport and feeling more comfortable.
So not true. This is why meeting your wedding photographer before hand is so important. A good wedding photographer will make you feel like a million bucks, seamlessly blend into the background for all those perfect moments, and also make you comfortable. Meet them before, skype with them, book an engagement shoot. There is a photographer to fit you. Our wedding photographer Donna of ClickClick Bang Photography is a tattooed zombie loving bad ass, so I knew she was perfect for us! It's not all stuffy men in suits now, you can find someone you click with easily.
Photography by Emma and Rich
Smoke bombs and off camera flash, amazing!
3. Having a friend do it means you can see the photos right away!
Yup. You can see their unedited, not properly composed, not correctly exposed photos right away! The reason you have to wait to get your photos back from a professional is because they have to edit every single photo to get that look you want. Wedding photography is mostly seasonal work, April-September is prime season and so so busy for photographers, so a little patience is worth it for those photos that you will treasure forever.
The photo below is a panorama made up of 45 images! So much time and work for a beautiful photograph full of depth. Well worth some patience.
Photography by ClickClick Bang
4. It's convenient! If the person taking the photos is already a guest they are already at the event.
I've been on the other end of this one, as a relative who was asked to take photos at a wedding, and let me just say, it bloody sucks. You don't get to enjoy the wedding or experience it, you miss out on all the moments you are supposed to be enjoying and being a part of. I actually think it's really unfair to ask a guest to do this. You invite someone to your wedding to be a part of your day, not to have to work all day. They should be dancing with you, not snapping away watching.
The light in this is just at the perfect location, due to an off camera flash! Those hair lights.
5. You can always edit the photos with apps after.
.... I can't even begin to explain how wrong this one is. Sure Instagram is fun for your selfies, but the resolution of most photos put through apps is so small you could never print them at a decent size. You are not going to be able to do a professional photoshop edit on a photo through an app, especially when the photo wasn't of professional quality to begin with. You will end up with grainy, low resolution photos with a gimmicky edit, instead of a beautiful photo that will stand the test of time that you could show future generations.
Photography by Adam De-Ste-Croix http://www.saintecroix.co.uk/
This was taken as a surprise streak from a wedding guest into the sea! A perfect hilarious moment captured forever.
6. A non-professional gives you a different perspective!
Do you know why a photographer doesn't use a GoPro with it's fish eye lens? Or hold the camera at a jaunty angle? It's because it's a gimmick. It might be fun now, but in 10 years time you'll be cringing at that extreme wide angle, and that selective colouring. Your wedding photography should last forever, not follow all the fun social media trends.
No amateur is going to get you something so spectacular.
7. It's more special if someone you know takes the photos.
Sure, if someone you love takes the photos you can think of them fondly... but what if it all goes wrong and you fall out with them? What if they don't take the photos you expected and instead disappoint you? Your relationship will never be the same again, and it's just not worth losing someone you love over. Can you imagine having to look at photos your brother's ex wife took who cheated on him a bunch for example? I know I wouldn't be able to look at them the same. This won't happen if you hire a neutral professional.
Photography by Simon Dewey
Such a cute moment, a pro knows what to keep an eye out for.
When you hire a professional, you have back up. If your photographer is ill, they can and will get you a replacement for them at super short notice. If their memory cards corrupt they will be much more likely to be able to recover those photos for you. If it rains all day and is super gloomy, they'll have lights and ways to work around it. They have insurance to cover themselves and their equipment saving you any headaches. They have back up cameras and external lighting, so if your drunk Aunt spills their pint on their camera, they have another one! Can your mate with a camera say that?
Photography by Dom Clark
Wedding photography is about moments. Capturing all those sweet exchanges, those laughs and the joy. It's being daft and having an idea that works! Like in the shot above by Dom Clark, what an ace concept for a shot of the groomsmen!
Like a lot of people, I only plan to get married the once. It's going to be one of, if not the biggest day of my life, and I want it preserved perfectly in photos to keep forever. Your photos are such a big part of the day, and picking the right photographer is so so important. I've seen a trend recently in magazines and various media outlets suggesting that actually, rather than spend money on an incredible professional photographer, you should just get a mate to do it!
There are a whole bunch of things wrong with that suggestion, and I'm going to talk about why you should book a real, actual, wedding photographer, and the reasons people usually give for not doing it.
There was an ugly sign on the lawns in this photo, not anymore with a pro!
1. Wedding photography is expensive.
Damn right it is! So first off, when you book a wedding photographer, you aren't just paying for that one day. You are paying for years of skill, training, practice, editing and love for their job. Photographing a wedding is bloody terrifying. And I know that, because I've done it! It is the most important day of most people's lives, and they are trusting you to give them because photos back, so wouldn't you want to give that job to an experience professional? Editing your wedding photos takes hours and hours. Every single photo needs assessing and checking, and processing and perfecting. A raw iPhone or camera photo is not the same thing a wedding photographer gives you. Do you have any idea how long it takes to put together an album? To make sure it flows perfectly and tells a story?You are paying for skills, time, experience and love. Your wedding photos are forever. Saving a couple of quid in the long run isn't worth it.
Photography by Naomi Jane Photography
That rainbow! It takes serious skill to capture that and the rest of the scene so well.
2. Having a friend do it means a better rapport and feeling more comfortable.
So not true. This is why meeting your wedding photographer before hand is so important. A good wedding photographer will make you feel like a million bucks, seamlessly blend into the background for all those perfect moments, and also make you comfortable. Meet them before, skype with them, book an engagement shoot. There is a photographer to fit you. Our wedding photographer Donna of ClickClick Bang Photography is a tattooed zombie loving bad ass, so I knew she was perfect for us! It's not all stuffy men in suits now, you can find someone you click with easily.
Photography by Emma and Rich
Smoke bombs and off camera flash, amazing!
3. Having a friend do it means you can see the photos right away!
Yup. You can see their unedited, not properly composed, not correctly exposed photos right away! The reason you have to wait to get your photos back from a professional is because they have to edit every single photo to get that look you want. Wedding photography is mostly seasonal work, April-September is prime season and so so busy for photographers, so a little patience is worth it for those photos that you will treasure forever.
The photo below is a panorama made up of 45 images! So much time and work for a beautiful photograph full of depth. Well worth some patience.
Photography by ClickClick Bang
4. It's convenient! If the person taking the photos is already a guest they are already at the event.
I've been on the other end of this one, as a relative who was asked to take photos at a wedding, and let me just say, it bloody sucks. You don't get to enjoy the wedding or experience it, you miss out on all the moments you are supposed to be enjoying and being a part of. I actually think it's really unfair to ask a guest to do this. You invite someone to your wedding to be a part of your day, not to have to work all day. They should be dancing with you, not snapping away watching.
The light in this is just at the perfect location, due to an off camera flash! Those hair lights.
5. You can always edit the photos with apps after.
.... I can't even begin to explain how wrong this one is. Sure Instagram is fun for your selfies, but the resolution of most photos put through apps is so small you could never print them at a decent size. You are not going to be able to do a professional photoshop edit on a photo through an app, especially when the photo wasn't of professional quality to begin with. You will end up with grainy, low resolution photos with a gimmicky edit, instead of a beautiful photo that will stand the test of time that you could show future generations.
Photography by Adam De-Ste-Croix http://www.saintecroix.co.uk/
This was taken as a surprise streak from a wedding guest into the sea! A perfect hilarious moment captured forever.
6. A non-professional gives you a different perspective!
Do you know why a photographer doesn't use a GoPro with it's fish eye lens? Or hold the camera at a jaunty angle? It's because it's a gimmick. It might be fun now, but in 10 years time you'll be cringing at that extreme wide angle, and that selective colouring. Your wedding photography should last forever, not follow all the fun social media trends.
No amateur is going to get you something so spectacular.
7. It's more special if someone you know takes the photos.
Sure, if someone you love takes the photos you can think of them fondly... but what if it all goes wrong and you fall out with them? What if they don't take the photos you expected and instead disappoint you? Your relationship will never be the same again, and it's just not worth losing someone you love over. Can you imagine having to look at photos your brother's ex wife took who cheated on him a bunch for example? I know I wouldn't be able to look at them the same. This won't happen if you hire a neutral professional.
Photography by Simon Dewey
Such a cute moment, a pro knows what to keep an eye out for.
When you hire a professional, you have back up. If your photographer is ill, they can and will get you a replacement for them at super short notice. If their memory cards corrupt they will be much more likely to be able to recover those photos for you. If it rains all day and is super gloomy, they'll have lights and ways to work around it. They have insurance to cover themselves and their equipment saving you any headaches. They have back up cameras and external lighting, so if your drunk Aunt spills their pint on their camera, they have another one! Can your mate with a camera say that?
Photography by Dom Clark
Wedding photography is about moments. Capturing all those sweet exchanges, those laughs and the joy. It's being daft and having an idea that works! Like in the shot above by Dom Clark, what an ace concept for a shot of the groomsmen!
Next up in our adventures in DIY wedding creations, is coffee filter carnations. I have become totally addicted to making these and love how they look. You could use them for table decor, bouquets, to decorate the back of chairs, so many uses!
First up, gather your weapons. You need acrylic paint, plastic bowls, paintbrushes, a paint tray, bleached white round coffee filters, scissors and a stapler.
You can use any brand of paint or filters, but for this they need to be the round shape. They will start out looking pleated on the sides but that vanishes when you dye the filters. For optimum dyeing, the bleached white filters are a must.
First up, pick your paint, squeeze about a tablespoon's worth into a bowl, add a good amount of water (how much depends on what colour you want) and mix well. You will want to leave the water to settle for about half an hour, the acrylic paint starts out a little separated but it will mix.
You can dye a good amount of the filters together, I dunked about 15 at a time in the mixture, wiggled them a little to ensure they were totally covered, and then squeezed them out. You don't have to be particularly delicated with the coffee filters as they are designed to get wet.
To add extra interest we tipped the edges using an undiluted version of the paint in the paint tray. Make a taco shape with the filters and paint the edges of the filters. The more random and unplanned you are the better! Just make sure there is a good amount of coverage and paint.
You then need leave them to try. You can pop them on a radiator overnight, or you can cheat like we did and use a fan oven. If you use a fan oven do not leave them unattended. It is paper after all! 10 minutes at 160 degrees is all it took to dry them out completely and then they were ready to use.
Fold the coffee filter in half, then in half again.
You are now going to use the scissors to cut a scalloped edging on the filters. You need two different sizes, and roughly 3 of each to give a good fullness to the carnations.
Unfold them, and put the smaller papers on top of the bigger ones.
Pop your finger directly into the centre of the filters, and pinch the base together.
You need about a centimetre to act as the base of the flower.
Then staple! Staple it better than I have in this really quite terrible tutorial photo.
You then want to flatten it back out again as best you can.
And it's smushing time! Individually scrunch each filter into towards the centre, the scrunchier the better.
One you have scrunched them all in, give one more good scrunch to the whole thing, then separate each layer back out.
You might want to re-tip the flowers depending on how much you cut them.
Because we had very pale bases, I diluted the purple down again to tip the flowers.
And the finished product! You can them experiment with further decoration.
I added glitter paint to this one.
And this one was really experimental, I tipped with both bright pink and silver paint.
Aren't they so pretty? These are actually really quick and easy to make, which is good because I maybe have kind of a lot to make!
You could pop these onto floral wire with floral tape and make them into a bouquet or to be able to put them in a vase.
Do let me know if you make these, I'd love to see your versions!
Next up in our adventures in DIY wedding creations, is coffee filter carnations. I have become totally addicted to making these and love how they look. You could use them for table decor, bouquets, to decorate the back of chairs, so many uses!
First up, gather your weapons. You need acrylic paint, plastic bowls, paintbrushes, a paint tray, bleached white round coffee filters, scissors and a stapler.
You can use any brand of paint or filters, but for this they need to be the round shape. They will start out looking pleated on the sides but that vanishes when you dye the filters. For optimum dyeing, the bleached white filters are a must.
First up, pick your paint, squeeze about a tablespoon's worth into a bowl, add a good amount of water (how much depends on what colour you want) and mix well. You will want to leave the water to settle for about half an hour, the acrylic paint starts out a little separated but it will mix.
You can dye a good amount of the filters together, I dunked about 15 at a time in the mixture, wiggled them a little to ensure they were totally covered, and then squeezed them out. You don't have to be particularly delicated with the coffee filters as they are designed to get wet.
To add extra interest we tipped the edges using an undiluted version of the paint in the paint tray. Make a taco shape with the filters and paint the edges of the filters. The more random and unplanned you are the better! Just make sure there is a good amount of coverage and paint.
You then need leave them to try. You can pop them on a radiator overnight, or you can cheat like we did and use a fan oven. If you use a fan oven do not leave them unattended. It is paper after all! 10 minutes at 160 degrees is all it took to dry them out completely and then they were ready to use.
Fold the coffee filter in half, then in half again.
You are now going to use the scissors to cut a scalloped edging on the filters. You need two different sizes, and roughly 3 of each to give a good fullness to the carnations.
Unfold them, and put the smaller papers on top of the bigger ones.
Pop your finger directly into the centre of the filters, and pinch the base together.
You need about a centimetre to act as the base of the flower.
Then staple! Staple it better than I have in this really quite terrible tutorial photo.
You then want to flatten it back out again as best you can.
And it's smushing time! Individually scrunch each filter into towards the centre, the scrunchier the better.
One you have scrunched them all in, give one more good scrunch to the whole thing, then separate each layer back out.
You might want to re-tip the flowers depending on how much you cut them.
Because we had very pale bases, I diluted the purple down again to tip the flowers.
And the finished product! You can them experiment with further decoration.
I added glitter paint to this one.
And this one was really experimental, I tipped with both bright pink and silver paint.
Aren't they so pretty? These are actually really quick and easy to make, which is good because I maybe have kind of a lot to make!
You could pop these onto floral wire with floral tape and make them into a bouquet or to be able to put them in a vase.
Do let me know if you make these, I'd love to see your versions!
With the wedding less than 4 months away, my Mum and I have become a regular production line for our DIY projects! I wanted to share some with you so you can make them too. First up, DIY coffee filter roses. Yes, coffee filter roses! I would never have thought to use them, but after much googling apparently they were the way to go.
First up, you want some paint, and bleached cone coffee filters. We used Windsor & Newton paint, but any acrylic paint will do. To be able to get whatever colour roses you want, you need the bleached white filters, and for these roses, the cone shaped ones work best. You also need floral tape and wire, paintbrushes, 6 containers, a piece of card, a chopstick, a paint tray, and plastic bowls.
Next, mark up some containers with 1, 2, 3, 4, 5/6 and 7/8. You then need to cut out some templates to make your life much easier. The shapes below are what you need. Cut them out of the card.
Next, grab your floral tape, wire and piece 1.
Slide the wire through piece 1, and make a small loop at the top of the wire so it can't slide all the way through. Roll it around the wire tightly.
Now you need to get to grips with floral tape. You can use regular tape throughout and cover it with floral tape at the end, but it looks prettier with floral tape. It is tricky to use. It comes feeling kind of waxy, and when you gently stretch the tape it becomes sticky. Pull too hard and it will snap!
You can kind of see the difference in these. The little lines are where it is sticky now.
Tightly wrap the floral tape around the base of the coffee filter piece and onto the wire so that it is secure.
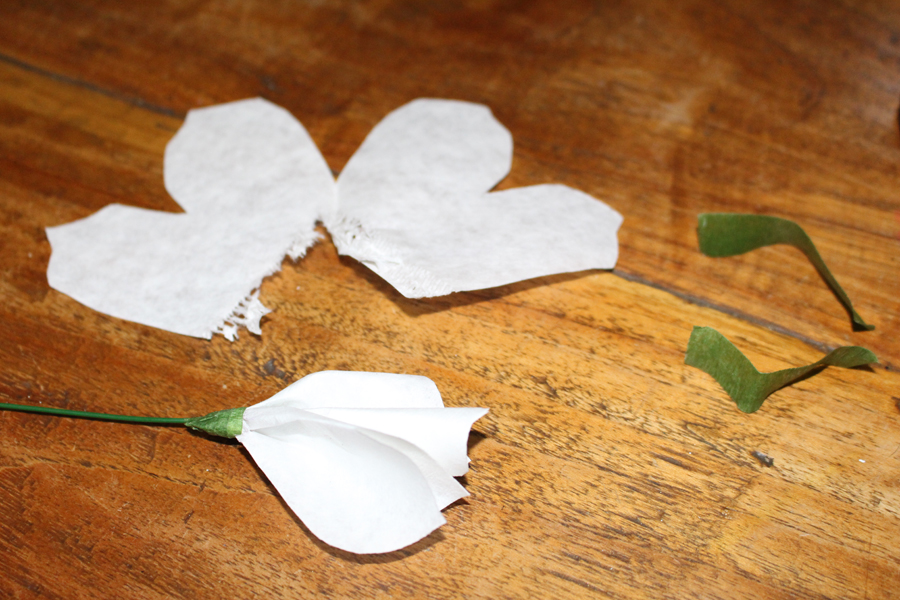
Next take piece two, and again pierce the wire through it and slide it to the top. You'll need to gentle tear the cone section of the coffee filter so that it is separated.
You then fold the extra petals backwards over the others.
You then need to sort of smush the bottom of the rose together so that you can tape it again.
You are then going to keep wrapping the next pieces around the base bit by bit. Next up is piece 3, which again needs tearing along the cone filter.
Next is piece 4 which is much bigger, tear the bottom again and wrap it around. Try to keep the petals spaced well so that they are regular and there aren't any gaps.
Pieces 5/6 and 7/8 are individual petals. Using 3 at a time, overlap them and tape to the base of the flower. How many of these you use depends on how full you want the rose to be. We decided 4 lots of each (so 12 of the individual pieces) created the fullness we liked.
This gives the general rose shape.
Ensure you wrap the floral tape tightly, and probably slightly higher than you think you need to keep it totally secure.
Next is the dying! Mixing about a tablespoon's worth of paint with water. How much water depends on what colour you want the roses to be. We wanted them to be more pastel toned, so used quite a lot of water. We used plastic food bowls that were easy to wash in case of staining.
Then... dunk!
Make sure the rose is totally soaked, then you can really squeeze it to ring out any excess water.
Then leave to dry! This method takes quite a long time to dry, so we left them over night on the radiator. You can also hand paint the roses with watered down acrylic paint if you want them to dry more quickly.
Then the final decoration is up to you!
One of our favourite looks was a slightly ombre look. To achieve this is super easy! I popped some of the undiluted paint into a paint tray, and painted just the tips of the roses.
We've made pink, purple and grey roses so far.
You can also add glitter for extra sparkle. We used a really cheap kids paint from Sainsbury's and randomly painted some of the edges of the flower. I love how this looked!
The final step requires the rose to be totally dry. As you can see in these, the petals are quite straight and point upwards. Fix this using the chopstick, tuck it under the outside of the petal at the top edge, and roll it downwards. You only need to do the very top edges of the frames, and for the more pointed petals do two rolls, in a triangle shape. Easy to do, and it finished them off nicely.
Ta Da! Don't they look so cool? These could be used to make bouquets or button holes, table decorations, or even to have in a vase without having to worry about them dying like regular flowers.
These can be a little fiddly, but with practice they get much easier. I'm so looking forward to using these in our wedding and being able to tell everyone that we made them! These sell on Etsy for a good £8 a rose and upwards, but these cost pennies per rose with us making them in bulk.
If you give this tutorial a go, please do let me know.
With the wedding less than 4 months away, my Mum and I have become a regular production line for our DIY projects! I wanted to share some with you so you can make them too. First up, DIY coffee filter roses. Yes, coffee filter roses! I would never have thought to use them, but after much googling apparently they were the way to go.
First up, you want some paint, and bleached cone coffee filters. We used Windsor & Newton paint, but any acrylic paint will do. To be able to get whatever colour roses you want, you need the bleached white filters, and for these roses, the cone shaped ones work best. You also need floral tape and wire, paintbrushes, 6 containers, a piece of card, a chopstick, a paint tray, and plastic bowls.
Next, mark up some containers with 1, 2, 3, 4, 5/6 and 7/8. You then need to cut out some templates to make your life much easier. The shapes below are what you need. Cut them out of the card.
Next, grab your floral tape, wire and piece 1.
Slide the wire through piece 1, and make a small loop at the top of the wire so it can't slide all the way through. Roll it around the wire tightly.
Now you need to get to grips with floral tape. You can use regular tape throughout and cover it with floral tape at the end, but it looks prettier with floral tape. It is tricky to use. It comes feeling kind of waxy, and when you gently stretch the tape it becomes sticky. Pull too hard and it will snap!
You can kind of see the difference in these. The little lines are where it is sticky now.
Tightly wrap the floral tape around the base of the coffee filter piece and onto the wire so that it is secure.
Next take piece two, and again pierce the wire through it and slide it to the top. You'll need to gentle tear the cone section of the coffee filter so that it is separated.
You then fold the extra petals backwards over the others.
You then need to sort of smush the bottom of the rose together so that you can tape it again.
You are then going to keep wrapping the next pieces around the base bit by bit. Next up is piece 3, which again needs tearing along the cone filter.
Next is piece 4 which is much bigger, tear the bottom again and wrap it around. Try to keep the petals spaced well so that they are regular and there aren't any gaps.
Pieces 5/6 and 7/8 are individual petals. Using 3 at a time, overlap them and tape to the base of the flower. How many of these you use depends on how full you want the rose to be. We decided 4 lots of each (so 12 of the individual pieces) created the fullness we liked.
This gives the general rose shape.
Ensure you wrap the floral tape tightly, and probably slightly higher than you think you need to keep it totally secure.
Next is the dying! Mixing about a tablespoon's worth of paint with water. How much water depends on what colour you want the roses to be. We wanted them to be more pastel toned, so used quite a lot of water. We used plastic food bowls that were easy to wash in case of staining.
Then... dunk!
Make sure the rose is totally soaked, then you can really squeeze it to ring out any excess water.
Then leave to dry! This method takes quite a long time to dry, so we left them over night on the radiator. You can also hand paint the roses with watered down acrylic paint if you want them to dry more quickly.
Then the final decoration is up to you!
One of our favourite looks was a slightly ombre look. To achieve this is super easy! I popped some of the undiluted paint into a paint tray, and painted just the tips of the roses.
We've made pink, purple and grey roses so far.
You can also add glitter for extra sparkle. We used a really cheap kids paint from Sainsbury's and randomly painted some of the edges of the flower. I love how this looked!
The final step requires the rose to be totally dry. As you can see in these, the petals are quite straight and point upwards. Fix this using the chopstick, tuck it under the outside of the petal at the top edge, and roll it downwards. You only need to do the very top edges of the frames, and for the more pointed petals do two rolls, in a triangle shape. Easy to do, and it finished them off nicely.
Ta Da! Don't they look so cool? These could be used to make bouquets or button holes, table decorations, or even to have in a vase without having to worry about them dying like regular flowers.
These can be a little fiddly, but with practice they get much easier. I'm so looking forward to using these in our wedding and being able to tell everyone that we made them! These sell on Etsy for a good £8 a rose and upwards, but these cost pennies per rose with us making them in bulk.
If you give this tutorial a go, please do let me know.