
With the wedding less than 4 months away, my Mum and I have become a regular production line for our DIY projects! I wanted to share some with you so you can make them too. First up, DIY coffee filter roses. Yes, coffee filter roses! I would never have thought to use them, but after much googling apparently they were the way to go.
First up, you want some paint, and bleached cone coffee filters. We used Windsor & Newton paint, but any acrylic paint will do. To be able to get whatever colour roses you want, you need the bleached white filters, and for these roses, the cone shaped ones work best. You also need floral tape and wire, paintbrushes, 6 containers, a piece of card, a chopstick, a paint tray, and plastic bowls.


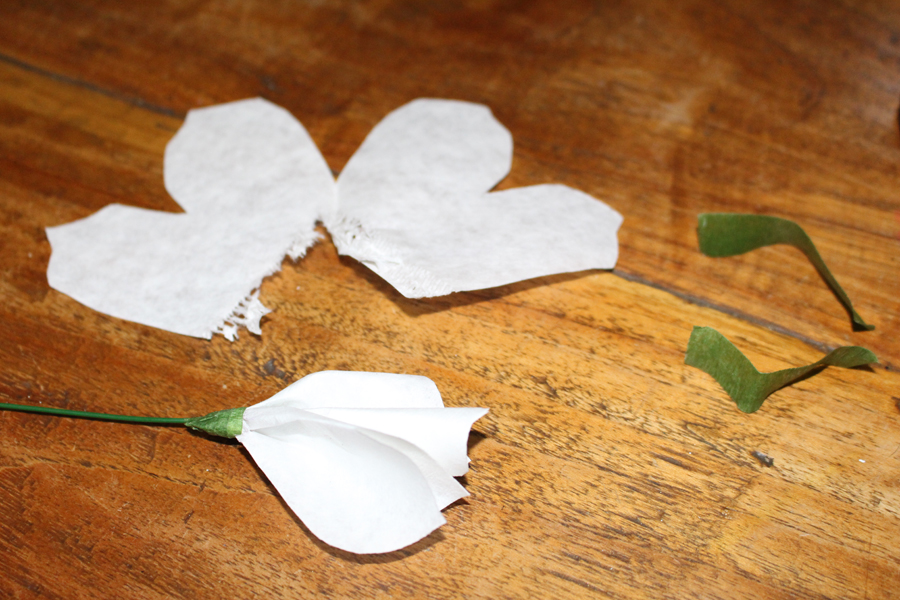
Next, mark up some containers with 1, 2, 3, 4, 5/6 and 7/8. You then need to cut out some templates to make your life much easier. The shapes below are what you need. Cut them out of the card.


Next, grab your floral tape, wire and piece 1.

Slide the wire through piece 1, and make a small loop at the top of the wire so it can't slide all the way through. Roll it around the wire tightly.

Now you need to get to grips with floral tape. You can use regular tape throughout and cover it with floral tape at the end, but it looks prettier with floral tape. It is tricky to use. It comes feeling kind of waxy, and when you gently stretch the tape it becomes sticky. Pull too hard and it will snap!


You can kind of see the difference in these. The little lines are where it is sticky now.

Tightly wrap the floral tape around the base of the coffee filter piece and onto the wire so that it is secure.

Next take piece two, and again pierce the wire through it and slide it to the top. You'll need to gentle tear the cone section of the coffee filter so that it is separated.

You then fold the extra petals backwards over the others.

You then need to sort of smush the bottom of the rose together so that you can tape it again.

You are then going to keep wrapping the next pieces around the base bit by bit. Next up is piece 3, which again needs tearing along the cone filter.
Next is piece 4 which is much bigger, tear the bottom again and wrap it around. Try to keep the petals spaced well so that they are regular and there aren't any gaps.

Pieces 5/6 and 7/8 are individual petals. Using 3 at a time, overlap them and tape to the base of the flower. How many of these you use depends on how full you want the rose to be. We decided 4 lots of each (so 12 of the individual pieces) created the fullness we liked.

This gives the general rose shape.

Ensure you wrap the floral tape tightly, and probably slightly higher than you think you need to keep it totally secure.


Next is the dying! Mixing about a tablespoon's worth of paint with water. How much water depends on what colour you want the roses to be. We wanted them to be more pastel toned, so used quite a lot of water. We used plastic food bowls that were easy to wash in case of staining.

Then... dunk!

Make sure the rose is totally soaked, then you can really squeeze it to ring out any excess water.

Then leave to dry! This method takes quite a long time to dry, so we left them over night on the radiator. You can also hand paint the roses with watered down acrylic paint if you want them to dry more quickly.
Then the final decoration is up to you!
One of our favourite looks was a slightly ombre look. To achieve this is super easy! I popped some of the undiluted paint into a paint tray, and painted just the tips of the roses.

We've made pink, purple and grey roses so far.

You can also add glitter for extra sparkle. We used a really cheap kids paint from Sainsbury's and randomly painted some of the edges of the flower. I love how this looked!

The final step requires the rose to be totally dry. As you can see in these, the petals are quite straight and point upwards. Fix this using the chopstick, tuck it under the outside of the petal at the top edge, and roll it downwards. You only need to do the very top edges of the frames, and for the more pointed petals do two rolls, in a triangle shape. Easy to do, and it finished them off nicely.

Ta Da! Don't they look so cool? These could be used to make bouquets or button holes, table decorations, or even to have in a vase without having to worry about them dying like regular flowers.
These can be a little fiddly, but with practice they get much easier. I'm so looking forward to using these in our wedding and being able to tell everyone that we made them! These sell on Etsy for a good £8 a rose and upwards, but these cost pennies per rose with us making them in bulk.
If you give this tutorial a go, please do let me know.
Much love,
Kitty xxx
Great tutorial. I will be giving this a go.
ReplyDeleteawesome! Do let me know if you do so I can see how they come out!
DeleteThese look amazing! I love the colours. We made paper rose pomanders for my wedding - I still have them all actually - took many nights of rolling and glueing!
ReplyDeleteC xx
CurvyGirlThin.com
thanks lovely! That is so fab, I love the idea that we can keep these afterwards. I have a few more tutorials of other paper flowers we are making, made 75 carnations tonight with my Mum and Auntie! xxx
DeleteWhat a great idea, and they look amazing - thanks for sharing x
ReplyDeleteThanks for taking the time to discuss this, I feel strongly about it and love learning more on this topic. If possible, as you gain expertise, would you mind updating your blog with extra information? It is extremely helpful for me. View more
ReplyDelete